
Inside the Atmospheric Movement 5E Lesson
The 5E instructional model walks students through five phases: Engage, Explore, Explain, Elaborate, and Evaluate. It flips the traditional lecture-first sequence. Students explore a concept with their hands before you ever explain it, which means by the time you do explain it, they have something to hook the vocabulary onto.
I switched to the 5E model years ago and stopped going back. Kids retain more, ask better questions, and stop staring at me waiting to be told the answer. The Atmospheric Movement 5E Lesson is built on this framework from start to finish. Here's how it plays out across the five phases.
🎯 Engage

Day one is a teacher-led convection demo with a clear container of water, food coloring, and a heat source on one side. Students predict what's going to happen, then watch the dye creep up over the warm side, drift across the top, and sink back down on the cool side. Same loop that happens in the atmosphere, just slowed down so you can see it.
After the demo, students sketch the convection loop and try to predict where they'd find rising air, sinking air, and surface wind on a small map of a coastline. By the end of the period, kids have a working mental model of why air moves at all, and they're starting to use words like "warm air rises" without having been handed a definition yet. That's the point. They're walking into the rest of the unit with a working mental model, not a memorized definition.
What's included in the Engage:
- Teacher directions for the convection demo
- Printable student observation and prediction sheet
- Answer key for the discussion questions
- Four learning objective slides (standard verbatim, the academic verb highlighted, "I CAN...", and "WE WILL...")
- An illustrated Weather & Climate Word Wall in English and Spanish covering the unit vocabulary
🔬 Explore
The Atmospheric Movement Station Lab is the heart of the Explore phase. Students rotate through 8 stations (plus a 9th challenge station for early finishers) over one class period. The Station Lab is split into four input stations (where kids take in new information) and four output stations (where they show what they learned).
The four input stations:
- 🎬 Watch It! — Students watch a short video on air pressure, convection, and global wind belts with guided viewing questions.
- 📖 Read It! — A one-page reading passage on pressure, wind, and the Coriolis effect at two differentiated levels, with a Spanish version included.
- 🔬 Explore It! — A hands-on pressure-and-wind activity (think balloon, soda bottle, or paper-strip airflow) where students see air moving from high pressure to low pressure.
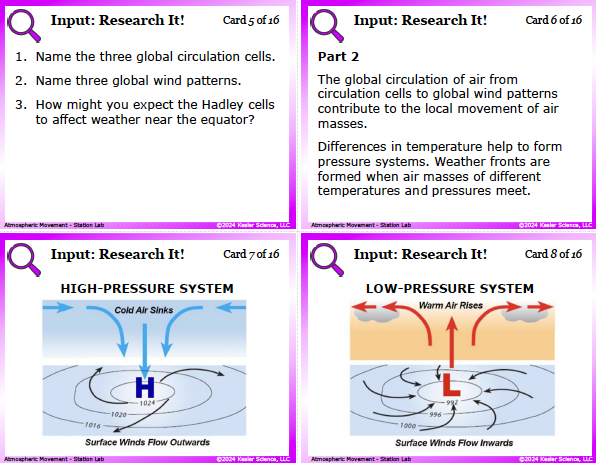
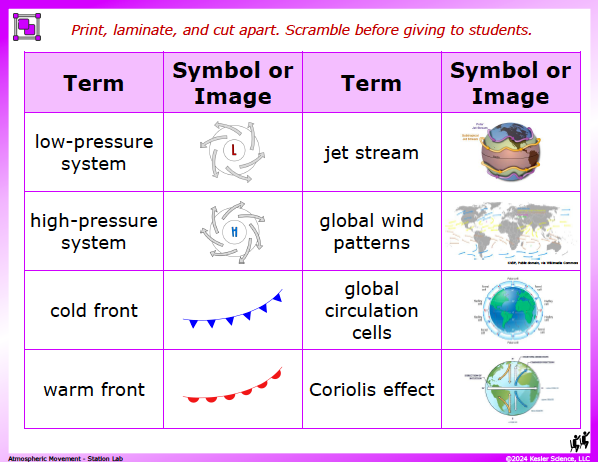
- 💻 Research It! — Reference cards on the Hadley, Ferrel, and Polar cells, the trade winds, the westerlies, the polar easterlies, and the jet stream.
The four output stations:
- 📋 Organize It! — A card sort where students match global wind belts and pressure zones to their latitudes.
- 🎨 Illustrate It! — Students draw a labeled diagram of the three convection cells in one hemisphere, with surface winds and rising/sinking air arrows.
- ✍️ Write It! — Three open-ended questions in complete sentences (this is where you see who really gets it).
- 📝 Assess It! — A short formative check with multiple choice and a fill-in-the-blank vocabulary paragraph.
Print and digital versions are both included. If you want the full breakdown of what happens at every single station, what students produce, and how to set it up, that's in our dedicated Station Lab post.
→ Read the full Atmospheric Movement Station Lab walkthrough 8 stations, materials list, teacher tipsThe Station Lab is included in the full 5E lesson. You don't need to buy it separately if you're getting the whole unit.
📚 Explain
Here's the real payoff of doing the Engage and Explore before the Explain: by the time kids hit this phase, they've already watched convection happen in colored water and felt air move from high to low pressure. They have a working understanding before you ever start naming things. The discussions get deeper, the questions get sharper, and you spend less time defining and more time pushing their thinking.
The Atmospheric Movement Presentation walks 8th graders through the full scope of TEKS 8.10B, one concept at a time. The deck opens with a quick reset on the atmosphere itself (a thin layer of air that surrounds Earth, holding the gases plants and animals need to breathe and playing a key role in weather). Students learn how altitude affects density: as altitude increases, there are fewer air molecules, so the air is less dense. That sets up air pressure as the weight of the air above a given point, measured with a barometer in millibars or inches of mercury, with the average sea-level pressure around 1013 mb.
From there, the deck builds out the engine of all atmospheric motion: uneven heating creates temperature differences, temperature differences create pressure differences, and air flows from high pressure to low pressure. Warm air is less dense, so it rises and leaves behind a region of low pressure at the surface. Cool air is denser, so it sinks and creates high pressure. That flowing air is wind, and the bigger the pressure gradient, the stronger the wind. Students learn to read isobars on a weather map and predict which way the wind blows. They also learn that high pressure systems usually mean clear, calm weather (because the sinking air does not form clouds) and low pressure systems usually mean clouds and precipitation (because rising air cools and condenses).
The deck then zooms out to the global scale. Three giant convection loops in each hemisphere, the Hadley cell, the Ferrel cell, and the Polar cell, organize the world's wind belts. Surface winds in the tropics blow east to west as the trade winds. In the middle latitudes, the prevailing westerlies blow west to east (which is why most U.S. weather moves west to east). Near the poles, the polar easterlies blow east to west again. Up at the boundaries between cells, fast-moving rivers of air called jet streams snake around the planet at altitude, steering storms and dipping south to bring cold air in winter.
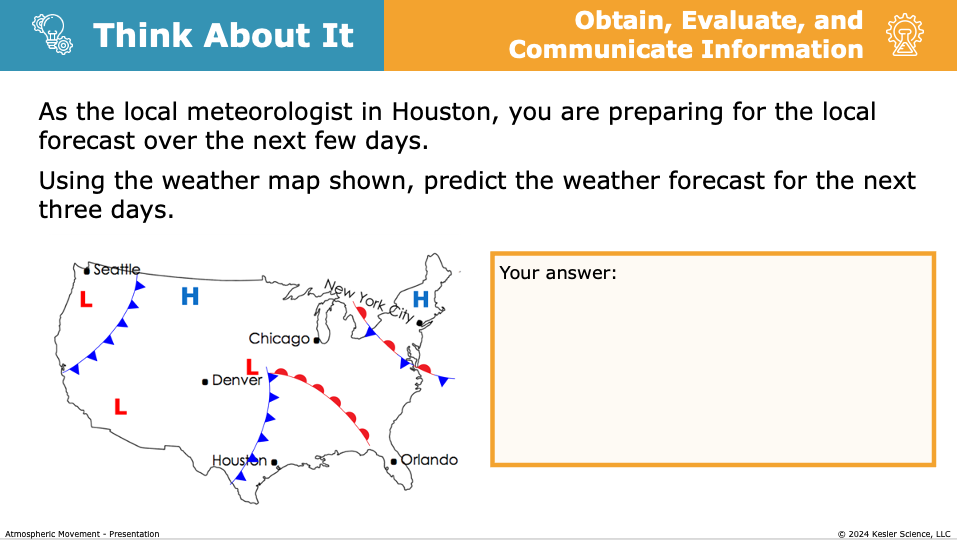
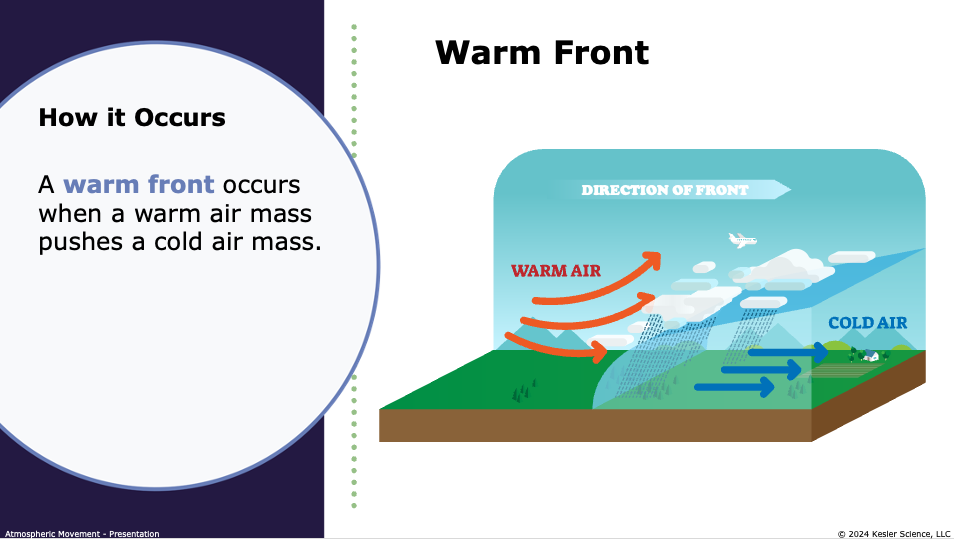
The standard's other tricky piece, the Coriolis effect, gets its own focused treatment. Because Earth rotates west to east, any moving air or water gets deflected to the right in the Northern Hemisphere and to the left in the Southern Hemisphere. Coriolis is why winds curve instead of flowing in straight lines from high to low pressure, why hurricanes spin counterclockwise north of the equator and clockwise south of it, and why the jet stream waves rather than running in a straight latitude line. And no, the deck makes clear, Coriolis does not steer the water down your bathtub drain. The deck closes by tying the global picture back to local weather, including weather fronts where warm and cold air masses collide.
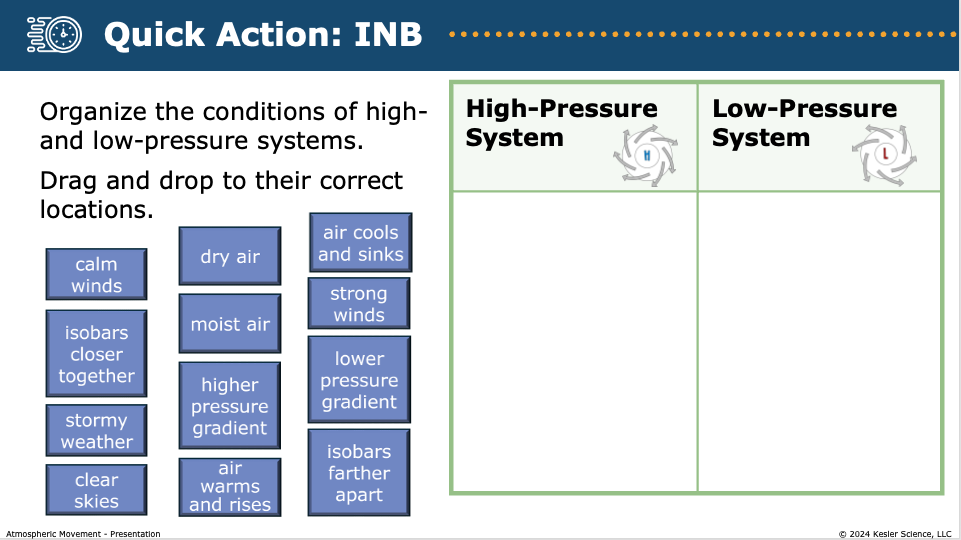
What makes this Presentation different from a typical Earth science slideshow is that kids are doing something on almost every slide. It's not a lecture deck. It's a participation deck. "Your answer:" prompts appear on most slides, Brain Breaks reset attention every few slides, Quick Action INB tasks (a convection-cell drawing, a high-vs-low pressure sort, a Coriolis demo reflection) show up throughout, and Think About It prompts push deeper into bigger ideas like why prevailing winds matter for everything from sailing to weather forecasting.
The Explain materials in this product include:
- An editable Presentation at two differentiated levels (Dependent and Modified), works in PowerPoint or Google Slides
- A guided fill-in-the-blank student notes handout that mirrors the Presentation, with answer key
- A Paper Interactive Notebook (English and Spanish) students cut, fold, and glue into their notebooks
- A Digital Interactive Notebook at both levels with answer keys, for 1:1 classrooms or Google Classroom
The Explain runs across two class periods. The built-in Think About It prompts are where the real discussion happens, so let those breathe.
🛠️ Elaborate
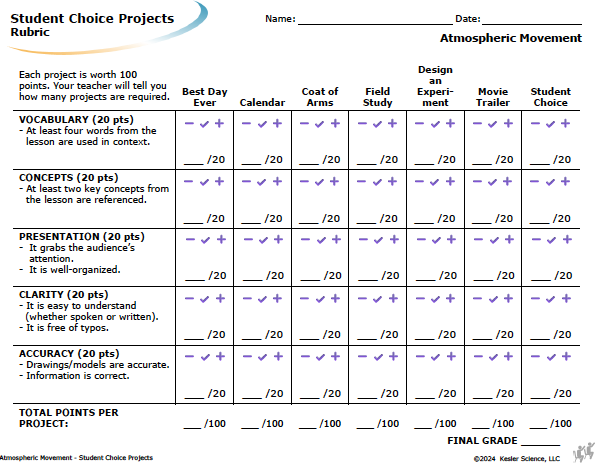
The Elaborate phase is where students stretch what they learned about atmospheric movement and put it into a project of their choosing. In this 8th grade weather and climate lesson, that's a Student Choice Project board with six different project options plus a "design your own" pathway.
Students might design a weather forecast for a fictional city that uses a real high or low pressure system, build a 3-D model of the three convection cells with rising and sinking air arrows, or write and record a short news segment explaining why a storm is curving due to the Coriolis effect. There are options for kids who love to write, kids who love to draw, kids who love to build, and kids who love to perform. Whatever the project, the point is the same: students apply global wind belts, pressure systems, and the Coriolis effect to a real-world artifact instead of a worksheet.
Choice is the whole point. By letting students pick how they show their thinking, you get more authentic work for TEKS 8.10B and you actually get to see what they understand about how air moves around the planet.
The rubric (the part teachers actually want)
Every project, no matter which option a student picks, is graded on the same 100-point rubric. Five categories at 20 points each:
- Vocabulary (20 pts) — At least four words from the lesson are used in context.
- Concepts (20 pts) — At least two key concepts from the lesson are referenced.
- Presentation (20 pts) — The project grabs attention and is well-organized.
- Clarity (20 pts) — Easy to understand. Free of typos.
- Accuracy (20 pts) — Drawings and models are accurate. The science is right.
The rubric uses a minus / check / plus shorthand on every row so you can grade a stack of projects quickly without re-reading every criterion.
Two differentiated versions in one file
The standard version is for students ready for independent application of atmospheric movement. The Reinforcement version is for students who need additional vocabulary or concept support, with three of the six options swapped for projects with a tighter vocabulary tie-in, and "design your own" replaced with "collaborate with the teacher" so kids aren't pitching cold.
✅ Evaluate
The Evaluate phase wraps the unit with a formal assessment. It's not all bubble-in. Several questions hand students a pressure map or a wind-belt diagram and ask them to label features or predict wind direction.
The full assessment has 12 questions across five formats:
- Multiple choice (4 questions) covering air pressure, convection cells, the Coriolis effect, and high/low pressure weather
- Hotspot / visual (2 questions) where students circle the area of lowest pressure on a weather map and identify the latitudes of the trade winds, westerlies, and polar easterlies
- Multiselect (2 questions) where students pick all statements that correctly describe wind formation or global wind belts
- Short answer (2 questions) on why air flows from high to low pressure and how the Coriolis effect changes the path of moving air
- Multipart scenario (2 questions) with a real-world setup (a hurricane heading toward Texas) where students explain wind direction, pressure, and Coriolis-driven rotation
A modified version is included for students who need additional support, with fewer multiple-choice distractors and sentence-starter scaffolds on the short-answer items.
If you've taught all five phases, this assessment shouldn't surprise anyone. It's a chance for kids to show you they get it.
How everything fits together
If you want the whole experience (Engage hook, the Station Lab as the Explore, the Explain day with Presentation and interactive notebook, the Student Choice Elaborate, and the Evaluate assessment all in one download), that's the Atmospheric Movement Complete 5E Science Lesson.
If you only need the one-day hands-on activity, the Station Lab works as a standalone. Most teachers buy the full 5E because the Station Lab works harder when it's bookended by a strong Engage and a follow-up Explain. But both are honest options.

Get the Atmospheric Movement 5E Lesson

Or if you only need the one-day hands-on Station Lab:
(The Station Lab is included in the full 5E Lesson)
Frequently asked questions
Does this cover all of TEKS 8.10B?
Yes. The full standard is addressed across all five phases, with global wind patterns and their local effects baked into the Engage convection demo, the Explore Station Lab, and the Presentation.
What do my students need to know before this lesson?
A basic understanding of energy transfer (especially convection), density, and the layers of the atmosphere. TEKS 8.10A makes a great prerequisite because it lays down the uneven-heating foundation.
How long does it take to teach?
Done with fidelity, about 10 class periods of 45 minutes each. One day for the convection Engage, two days for the Station Lab, two days for the Presentation and Interactive Notebook, three days for the Student Choice Project, and one to two days for review and the assessment. The product also ships with a compressed 8-day sample unit plan if you need to move faster.
Do I need special supplies?
A clear container and food coloring for the convection demo, a lazy-Susan or rotating turntable for the Coriolis demo, and some basic balloons and bottles for the Station Lab. Most teachers already have most of it.
Does this work for digital classrooms?
Yes. Every component has a digital version. The Station Lab is fully digital-ready (Google Slides), the Presentation works in Google Slides, and the Student Choice Projects can be submitted as videos, slide decks, or written work.
Is this 5E lesson aligned to NGSS too?
It aligns most directly with MS-ESS2-6 (developing and using a model to describe how unequal heating and rotation of Earth cause patterns of atmospheric and oceanic circulation). Built TEKS-first, but the standards overlap heavily.